subject: Learn How To Quilt Now - My 10 Excellent Recommendations [print this page] Handicrafts are popular nowadays and the art of quilting has many fans. If you want to learn how to make a quilt the simple way, then this article should be helpful as it offers valuable hints on quilting.
1. Pick Pattern: The very first thing that should be considered is the size of the quilt and then select an appropriate pattern. Seek ideas from other individuals who are good at quilting. You can find quilting magazines and books which provide comprehensive information on all aspects of quilting. Go online and browse thorough some of the quilting websites. The size of the quilt may also be affected by the kind of fabric you select.
2. Choose Fabric: Your decision making tasks are not finished yet, now you have to think about the design, color and the fabric that your quilt will be made from. The creative process is completely up to you however if the quilt is meant for somebody you know that could make these decisions simple to make. Before you go on to the next stage of quilting process, you need to wash, dry and iron the fabric materials.
3. Fabric Cutting: Using the pattern that has been selected the material needs to be cut into the appropriately shaped pieces. Then lay out the blocks on a table or the floor so that the length of the border sashing could be determined and cut.
4. Sew Shapes: You are all set to make the top of your quilt by arranging the pieces of material as outlined by the pattern and then sewing them together. Follow the instructions carefully and before stitching check whether all the fabric pieces are in the right positions. You can pin the pieces first to make stitching easier.
5. Choose Batting: Learning how to make a quilt would be quite easy if know and understand a few of the common quilting terms. The inner layer of the quilt is called the batting. If you would like the quilt to provide good warmth then you need to go for high loft batting. However, sewing a thick batting is a tough job. If you are using a fusible batting material which sticks to the top and bottom layers when ironed, then basting the fabric with batting will not be required.
6. Backing Selection: The backing is often a big piece of solid fabric. Make sure that your backing is a couple of inches longer than the quilt from all sides so that you can use it for the edging as well.
7. Layer Basting: The next step in your quilt making process would be to baste the three layers together. Selecting a fusible batting makes the task a lot simpler as you just have to iron the layers together. If sewing is required use a contrasting thread color which will be easy to remove later and stitch the pieces together . It would be better if you start from the middle of each side. While sewing just be sure you remove the wrinkles.
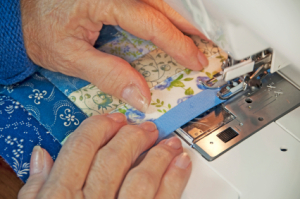
8. How to Sew: The next step is to sew the layers just the same way as you worked with the basting. Start sewing from the center towards the outer sides applying small even stitches. If you have got any specific sewing directions that came with the quilt pattern, you should follow them carefully. If it did not then stitch all of the borders and seams in the quilt block staying roughly a quarter inch away from existing seams.
9. Quilt Edging: If you basted the quilt you will now need to remove the stitches before edging your quilt. Bias tape should be sewn down one edge of the quilt and then folded over neatly to carry on down the next side. While edging around the corners of your quilt, be very careful to fold the fabric neatly.
10. Personalize Quilt: The last and the final step is quilt signing. Quilter can add her name on the quilt or perhaps give a specific name for the quilt pattern which is employed.