subject: How To Burn Vuze Movie To Dvd [print this page] Method 1. Burn Vuze Movie to DVD with Aimersoft DVD Creator
If you want to burn a professional personalized DVD from Vuze movie, you should have a try with Aimersoft DVD Creator, which allows you create customized DVD menu; edit Vuze movie with your preferred effects like transition, trimming, cropping, watermark adding and so on besides simple and easy DVD burning.
1Free Download and install Vuze to DVD Burner
2Add downloaded Vuze movie
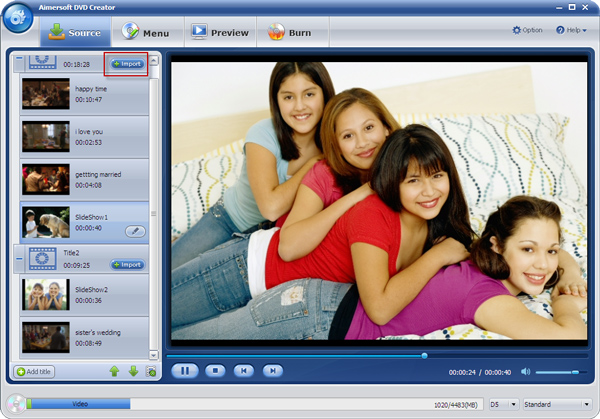
Click "Load Video" to browse your downloaded Vuze movies and add them to the program from your hard drive. They will appear in the collections pane.
3 Customize DVD (optional)
Aimesoft DVD Creator offers enough freedom on personalized DVD burning. You can free to customize a DVD menu, free to edit Vuze movie, and free to set transition effects. Of course, all these operations are optional. You can just choose one of them based on your own needs.
4Burn Vuze movie to DVD
With Aimersoft DVD Creator, you can choose to burn Vuze movie to DVD disc, DVD Folder or ISO file. Just select the right option before burning.
Note: Mac users please download Aimersoft DVD Creator for Mac and follow the above steps to burn Vuze movies to DVD on Mac.
Method 2. Burn Vuze Movie with Vuze Plus
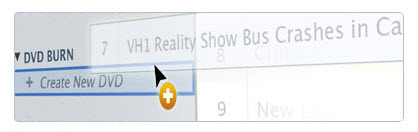
Step 1. Drag-and-drop
Purchase Vuze Plus. Enter your activation code. Simply drag a video file from your Library in Vuze or from a folder on your system to the "+ Create New DVD" item in the left sidebar under "DVD Burn".
Step 2. Organize DVD project
In the "New DVD" popup, give your DVD a memorable name, select the correct video format for your region, and click "OK". Vuze will take you to the DVD Burn screen for your new DVD project. Here you can see how much space you are using, how much is available, and a list of the files in your DVD project. Note that if you try to add more video than your DVD can hold, you will receive an error, and you will need to remove one or more files from the DVD project by clicking on it and clicking the "Delete" button at the top of the screen.
If you like, you can double click the titles of each of the video files to rename them. You can also drag the files around to reorder them however you like.
When you are satisfied with the DVD project, click "Burn DVD". Vuze will prompt you to make sure you have a blank DVD inserted in your drive. Once again, click "Burn DVD". Vuze will begin converting your videos to the proper format for playback. If you did not heed the advice before and insert a blank DVD, you will be prompted one last time to do so. Otherwise Vuze will simply transfer your videos to the DVD and eject the disc.
Comparison of DVD Creator and Vuze Plus (Burn DVD)